As this was my first time in either of the programs, I decided to take the obviously longer step in order, not only to create something that would be anatomically accurate, but to learn as much as I could in the process. the process itself consists of 3 main steps;
- Shaping a polyplane around half of the face to create the basic mesh with extrudes
- Mirror the geometry
- Combine the two pieces together
So, I began as I did with the previous model, in that I needed two orthographic views (front and side) in order to create the basic face shape from the front and use the side image to help create the depth.

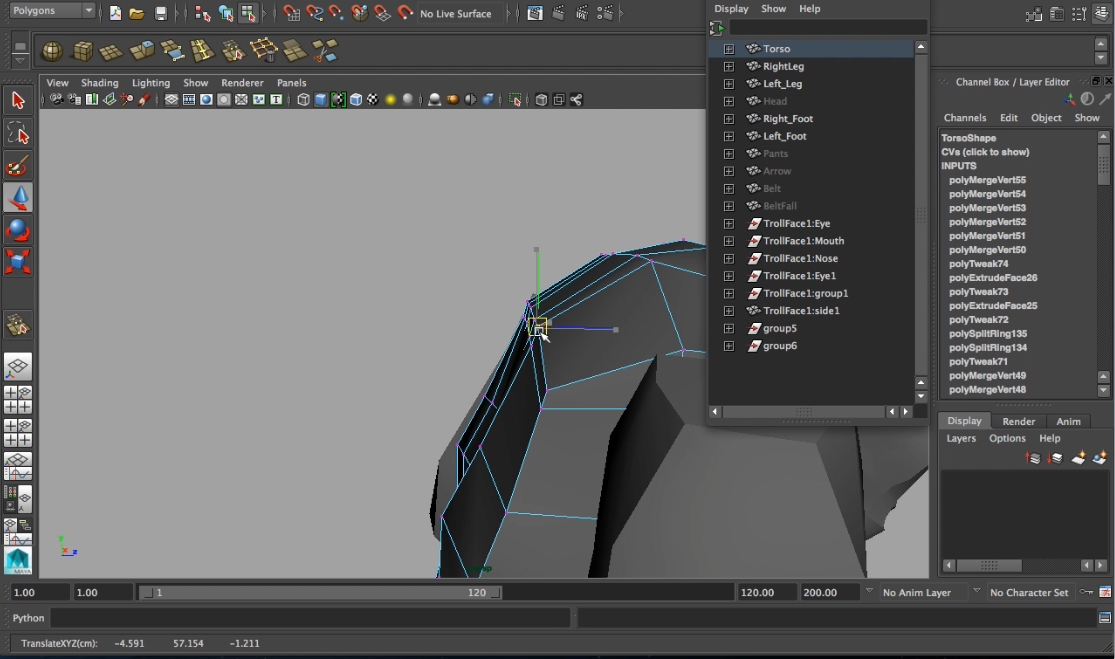
Laying the poly plane on the front of the face, I was able to move the vertices to hit the parts with the most depth on the face. As above, the polyplane is laid on the eye and manipulated to fit. Using both the views next to eachother made it much easier to follow the progression without having to constantly change views. With Maya, as both the views update together, having them next to eachother really increased the speed of my workflow and allowed me to move along with things quickly without being held back by trivial things such as flicking between viewports.

Extruding the edges and moving the vertices allows for the depth of the face to be created. Turning on and off shaded view allows for the model to seem as though taking place. Looking from the viewport on the left, we can see how the depth is created between the two orthographic views. Again, using both together in conjunction allows this piece to be build rather simply over time.

With the tutorial I was following, it was pointed out that the eyes, mouth and nose were the parts of the face that varied the most in depth. Although the tutorial I was following did not specify open mouths or even any other character than the one he was working on, I decided to follow this workflow as the justification of the depth made sense. With this, I again used a polyplane to create the mouth section, having to eyeball the depth of the inside of the lips. This in itself was not too difficult as I could follow sections of the construction I had made already, preparing for the combination of vertices later on.

Looking through the perspective view on the right, the depth allowed to flow from creation through these two orthographic views really shows. Although it does seem very square and blocky at this point, moving onto the sculpting program ZBrush will refine all of this.

Extruding the edges further and down towards the bottom of the chin proved a different challenge. As the photos I was working from were not taken at exactly the same distance with exactly the same angle, the pictures did not match correctly. Although this is not a huge issue, it does allow for a little manipulation of the mesh. Using knowledge of anatomy I was able to construct the mesh around the images I was working with, whilst also integrating my own desire for creation. Knowing the kind of character I wanted to create, I could use this to inspire the face and it's new direction with lack of rigidity.

Keeping the eye piece and the mouth piece separate helped me to see the ways these two piece would interact later on. Having only used the move tool up till this point, I felt confident enough that I could now begin to use the tools in a different way. As the many option in Maya allow for the different movements of objects, having this basic knowledge down allows me the freedom to play with what I had learnt. Vertex snapping is a common function of maya, and now having established the basic shape of the mouth and eye, I was able to effectively use this tool to snap the vertexes together without having to merge them at this point. Snapping them together gave me a more complete view of the final face mesh at this point.

As with the eye and the mouth, I created a separate piece for the nose. starting with the point, I could move backwards into the face to create the depth. Shaping it around the nostril and moving it down the septum allowed for the bridging of the entire face to be established.

With my initial intention to create something more along the lines of human, I stuck far too rigidly to my concept. Using my photographs as the concept work I began to construct an ear. Through the tutorials I had noticed that the polygons created for the face and the body had been rather large, but in order for me to create the ear, I would have to create something incredibly small in comparison. Having briefly looking into ZBrush, I know that the sub divisions made in ZBrush are restricted to the object you are using. With this the case, having this high poly ear as part of a low poly face mesh would give me very difficult working environments in ZBrush. For this reason, I decided my best course of action would be to leave the ear out. If necessary later on I could create a hole in the head, much like Shreks ear and Maipulate that. But for now I wanted to keep the polycount as low as possible as top not complicate matter later on.

With the nose roughed out and snapped together, I could further work on extruding edges to fit the entire head. Through learning how to manipulate the basic shapes to make the body earlier, the extrusion of edges seemed rather simple. As the main tools I would be using to create the face mesh would be the move and extrude tool, these both seemed rather simple. Unfortunately (as seen below) I ran into issues that I did not really know how to fix.

With some edges extruding black instead of the grey, I did the only thing I really knew I could do and began to undo all the work I had done. I tried numerous different ways of solving the problem, just being under the assumption that the material had somehow changed. This thought wasn't really justified as in the picture below, we can see one of the edged sticking through the face.

Selecting everything and duplicating it, I tried to see whether this issue carried over when placed together. Unfortunately the issue still remained. From watching the tutorial this had not been an issue and moving further with the face mesh seemed ridiculous until I could figure out what was causing this issue.

After working thorough a few Authodesk Maya forums, I came across a suggestion that made me aware of the smooth tool. This tool relaxes all the vertices and edges in order to show the way the object would look when completed. By doing this, any false edges can be seen as not fitting within the mesh properly. As below, the mesh does not remain fluent when transferred to smooth mode. The small triangle created shows the presence of another edge making it flip back on itself.


Electing to delete the faces instead of going back to an earlier autosave set me on the right path once again to creating this basic face mesh. Still keeping smoothing on when deleting the faces made it easier to locate the problem normals.

Going back to basic shape mode, I was able to again extrude the edges to create the face. This time i decided to leave shading on instead of using the normal wireframe mode. This way, if i were to run into anymore issues I would be able to see it straight away and hopefully rectify the issue.

Further extrusions lead me to the same issue, with the normals being inverted. This time the entire front portion of the face was effected. Due to my decision to stick with the current save file and continue on, some of the edges still proved to be problematic.

Working through again to try and resolve the problem, it seemed that the issue was caused by the same edges as before. This time, although the faces had been inverted, I could have converted the normals and continued, but as before, continuing with the issue would have effect later on in the process.

Through research again on forums, the gradient on the polys seen below is caused by the inclusion of extra edges. After having experienced this issue twice on the same object, I thought the best course of action would be to revert to one of my earlier auto saves. I would lose work in the process, But being able to rectify this problem and not just cover it up is important as i move forward with the project. Finding a solution to this now will only help me in the future, and learning how to deal with this problem while it arises will only help me. Because of that, reverting and working from an earlier auto save seems like the best idea.

Reverting back cleared up the issues I was having. Now that I am aware of what caused the problem, I can remove the steps I had taken and change my behaviour in the software to really help me move forward. With that, I continued to extrude the edges around the scalp and further extrude the cheeks as before to create the right hand side of the face. With the problem solved after much time spent on it, I was very eager to get a move on and complete the piece to merge with the body.


Manipulating the nose was fairly easy. Looking through images from the Lord of the Rings and character made for World of Warcraft, working out the geometry and shape of the mythical creatures became rather easy. Although the piece is entirely my own, working whilst inspired by worlds that are inhabited by similar creatures allowed me to use a lot more reference than I thought. Turning the nose up at the end not only allowed for than snarling look I was aiming for, but gave a more defined look to the mesh.

Adding further ridges to the nose through the manipulation of vertices gave me an even clearer ides of the model I wanted to end up with. Now having no ears with a snarled expression and a flat but angry head, I could see the head perhaps being set into the body a bit more than normal instead of sitting above the shoulders. Not only would this give a unique look to the creature, but it would allow me more freedom to steer away from the photographs and naturally progress the Troll.

Using smoothing to further refine the ridges also helps with working out if the geometry is correct. As before with the inverted normals, they appeared because of the extrusion I made to some of the edges. Having smoothing turned on when manipulating vertices also allows for these edges to show up when they're being moved. Although this doesn't necessarily help with the overall mesh as it will be flat geometry when moved to ZBrush, it does help when working out that the geometry is okay.


With the basic mesh ready to duplicate I was able to move onto the eye. As explained in the tutorial I was following the basic shape of the eyelids can be created and then a polygonal sphere placed for the eye. As moving the character over to ZBrush would not allow for the manipulation of points inside or outside of the object, using a sphere for the inside of the eye would allow me to create a basic eye ball shape and move on from there when sculpting. With this, I extruded the faces inwards to create the eye lid. Having moved the vertices initially to create the eye, the edged I had were in the right place to enable me to just push it backwards. After the depth had been created I wads able to just delete the faces and position the sphere.

After a small amount of manipulation I realised that the surround for the eye didn't fit exactly to the sphere. Although this could have become an issue, I repositioned the sides of the face to fit. Not only did this allow for me to fit the eye in properly, but in the process I managed to define a harsher bone structure around the eye that gave it a more menacing look.

With everything positioned correctly I could begin merging all the separate pieces together ready to duplicate.

With all the pieces merged, I took a shaded view from the side and realised although the eye had depth, there was nothing to show the iris. I knew I wasn't going to include a glaze over the eye to create the illusion, so I opted for a few more loops to create the overall idea of the realistic eye.

With this final tweak done, I was able to duplicate the face over and merge it together. With the face smoothed out, all the contours became very clear and the geometry could be viewed to see whether any bits stood out as problematic. Overall the face at this point really did work out the way I wanted it to. With the shape varying from the photograph I was happy to be able to include this on the body.


Importing the face onto the body was fairly simple. Obviously the sizing was different, but with the ability to scale it, I managed to fit it properly onto the body and work from there. Although the face looks much more detailed than the body, much of the intricate body details can be and will be done within ZBrush. The face needed this kind of detailing at this stage in order for me to create a base that I can work with and learn from. In the future I think I would definitely approach it this was again. Although it has taken time, I understand the need for this workflow. Both through visualising the end product and in order to create something anatomically accurate.

When reloading the scene, I was faced with another issue. For some strange reason when loading the scene back up some of it's elements went green. Seeing as these were some of the areas where the normals were affected before, I was concerned I would have to redo this entire section once again to achieve anything worth using.

Looking through forums yet again, it seems this issue is very common in Maya. Although being a fault, because it is so popular it was easy to find a quick fix. It turns out that Maya sometimes breaks connections between objects and their materials when saving. To fix the issue, one can either export the object as an OBJ file, then reimport it with the default materials assigned, or create a new polygon, group them together and delete the new object. I chose the latter. This in itself made more sense to may and required less steps, although the obj exporter would have done the same job, the layers I had create would have become separate again, and with the layers I had created I didn't want to have to move and rename them all.

From here I went about changing the body forms again to more closely match the completeness of the face. Although I was not matching that level of detail, establishing the geometry at this early stage would allow me to have some control over how the sub divisions would sit later on. For example, the image down below has 4 loops around the front face, and 2 down. With each of the polygons on that face established, they can only then be divided further into quarters when using ZBrushes sub divide tool. If I were to leave the body as a 6 sided cylinder, it would then sub divide from the centre outwards. With the larger belly area I wanted to create, having control over the way the sub divisions would be created gives me the freedom to choose where and how this excess material is coming from.

Much like the front, establishing base anatomy in the back will give me more control when sculpting the model.


Having hidden the face before to refine the geometry further, I now decided to show the face to make sure everything matched up correctly. As when exporting the objects to ZBrush they would all match up exactly as they were, I needed to make sure that everything matched up before moving.
Going round and sub dividing further, I wanted to take a look at some other peoples models of Trolls before sculpting to see the amount of detail included. Unfortunately there was not very much documented progress online, but I did come across another budding sculptor taking on a similar task to me.

The image below shows this artists model in Maya before transitioning over to ZBrush. The thing that I was mainly looking for is the sub divisions used and the poly count before moving over. Unfortunately the piece below is being smoothed out and had a little more detail that I would be looking at before moving over, but just by looking at the model below I felt like I was on the right track. As the tutorial that I was loosely following was not specifically looking at this kind of character, I wanted to make sure everything I was doing was necessary in this creative endeavour.

Below is the smoothed out face of this artists creation. Looking at the wireframing down the chest I could really get a feel for the spread he was using. Looking back at mine again, I could see the similarities in size. With this I felt I was really on the right track to begin sculpting.

Further blocking out the basic shape of the model, I established a few more features such as the feet and chest area. My initial intention was to include a chain in the left hand as another weapon, but after this much time I was beginning to feel the pressure of the project. Therefore I decided to duplicate the club in the right hand with the intention of changing it later in ZBrush so that the clubs, although the same weapon, were very much different.


No comments:
Post a Comment